
Read the board before the first tap
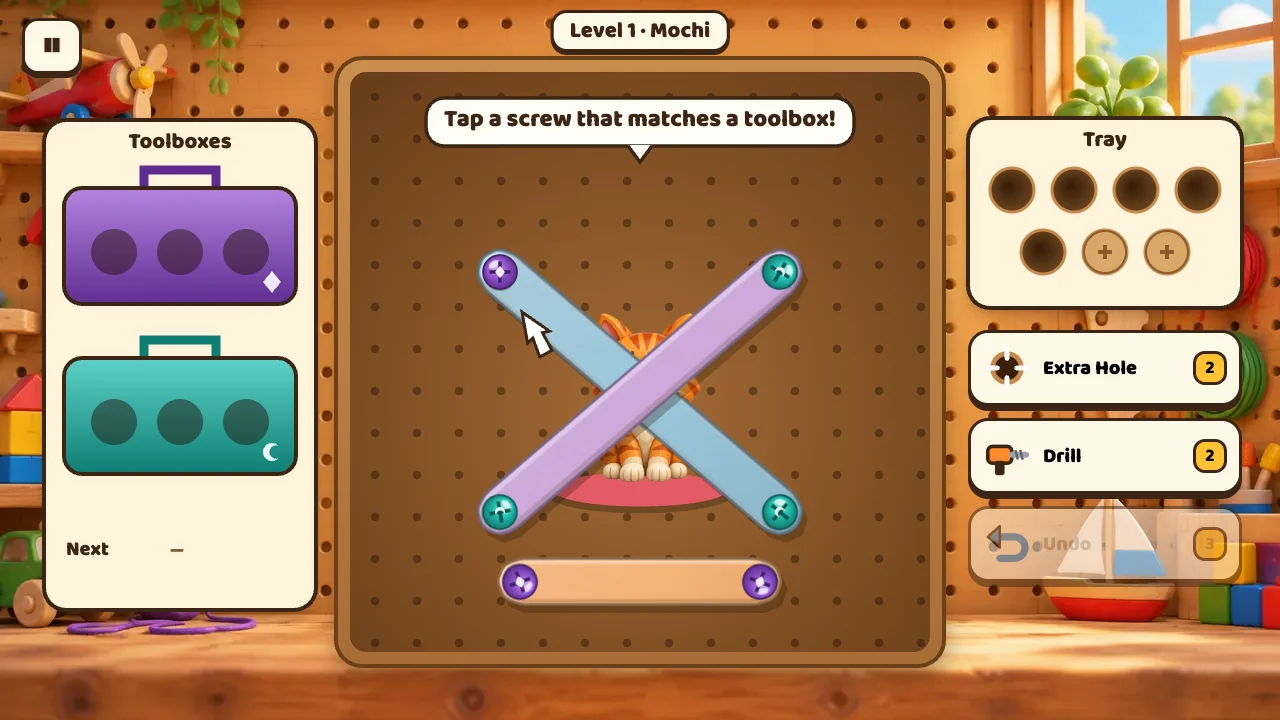
Press Play · Level 1 to begin the pet-rescue trail. The center contains overlapping planks; the toolbox and tray displays tell you where removed screws can go. A screw can look visible yet remain covered by a higher plank around its head.
Check three things before tapping: is the screw accessible, does its color match an active box, and how many tray spaces remain? A tight screw may need a first tap to loosen and a later tap to remove. A rejected tap on a covered screw does not mean its color is wrong.
Use the boxes to avoid unnecessary tray stock
The standard layout has two active boxes with three spaces each. A matching screw goes straight to a box. As boxes fill and new boxes enter, waiting screws of the newly wanted color can move out of the tray. Watch the current box colors again after each completed box: yesterday's priority may no longer be today's priority.
The tray usually starts with five spaces. It is temporary storage, not a second unlimited set of boxes. Removing different colors simply because they are easy to reach can fill it before you have revealed the matching screws needed to clear a box.
Compare two removal plans
Consider a hypothetical board with red and blue active boxes, four of five tray spaces already occupied, an accessible red screw and an accessible green screw. Removing green uses the last temporary space without helping either box. Removing red progresses a current box and preserves the spare tray space. That is usually the more useful first action.
The situation can change if removing a nonmatching screw frees a plank and uncovers the final matching screw for a box. Plan that short sequence before spending the temporary slot. Do not assume every red screw is best simply because red is active; physical access and what falls next also matter.
After releasing a plank's support, wait for its movement to settle and inspect the newly exposed layer. Clicking repeatedly at the old position can miss the new screw layout or overlook a useful color that has just appeared.
Know what the tools actually solve
| Tool | Purpose | Limitation |
|---|---|---|
| Extra Hole | Adds temporary tray capacity. | Capacity has a maximum; it does not fill a toolbox for you. |
| Drill | Lets you target a screw that ordinary removal cannot reach. | A nonmatching colored screw still needs somewhere to go. |
| Undo | Returns to a saved previous puzzle state. | Charges and available history are limited. |
Tools are aids, not proof that a puzzle has become solved. Spend one after identifying the precise obstacle. An extra tray hole buys planning room; a drill removes an access problem; undo lets you try a different order.
Practice a short sequence
- Find an accessible screw matching an active box.
- Remove it, then recheck the box and tray.
- Inspect whether its plank shifted to reveal another matching screw.
- If you must store another color, name the next useful screw you expect to uncover before tapping.
This guide explains the recurring logic rather than promising a solution for every generated level. The daily puzzle and later boards can use different layouts. For a grid puzzle without moving planks, try the Nonogram guide.